
image attribution: Shutterstock
Shutterstock is a stock photography service with over 300 million royalty-free, high-resolution photos, vectors, and illustrations, offering a number of subscription options, including a monthly subscription plan. The following tutorial will allow you to get the most out of your subscription.
We’ve had a number of inquiries on how to cancel your Shutterstock Monthly Subscription Plan. If you want to do so, scroll down to the bottom, and we’ll walk you through it. Otherwise, keep reading to learn how to maximize the benefits from your plan.
We will help you will plan ahead and be fully prepared to download the maximum number of images available to you. Bonus! We include a link to a free spreadsheet template to help you stay organized through this process.
Overview
Your monthly, no-contract $249 monthly subscription allows you to download 25 images a day. That means you can download 750 awesome images in one month if you follow this tutorial. We walk you through it step-by-step, helping you research, plan, stay organized and execute in the least amount of time every day.
Sign up for a free Shutterstock account
You can sign up for Shutterstock at no charge, and start to find and organize your content before you actually start the timer on your thirty day subscription. Using the free account, you can create Lightboxes and organize your content. Plan on signing up for the free account at least two weeks before you start the monthly subscription.
How to think about organizing your content
Start with a brainstorming or a mind map session. The following is a sample mind map for a blog about California (using SimpleMind for Mac). In some cases, you’ll find that Shutterstock has an incredible number of amazing images to use, such as Yosemite or the Golden Gate Bridge. In other cases, there may be no images for a specific restaurant, so try searching on phrases like “fine cuisine.”
The mind map is designed to get you thinking about all the potential content for which you might need high quality images. Substituting stock images for specific content needs is part of the process.
What’s an appropriate number of categories? While this is of course up to you and dependent on your project needs, a good target might be five images in each of five categories per day, for a total of 150 categories. These categories will be organized into Lightboxes in a subsequent step.
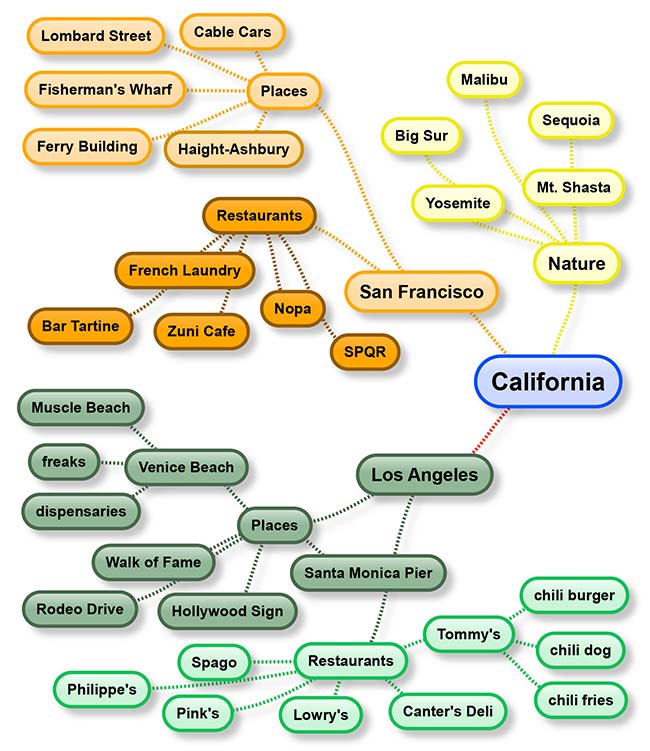
How to mind map topics for your monthly photo subscription
Once you’ve gotten a good handle on your content strategy (via a mind map or similar brainstorming tool), we’ll move on to organizing content by subject matter and by date. For more Content Strategy help, check out our a la carte Content Strategy Roadmaps.
About Editorial Images
When you start searching on Shutterstock for images, you’ll see that some of them are marked for Editorial Use Only. Here’s sample metadata from an image depicting the Boston Marathon:

Here’s how Shutterstock defines this designation:
An image labeled as “Editorial Use Only” on Shutterstock (an “editorial image”) is an image that cannot be used to advertise or promote a product or service. The people, objects or places in editorial images are not released.
An editorial image can be used to illustrate newsworthy and current events. It can also be used to illustrate subjects of human interest, including: the arts, business, culture, health and fitness, lifestyle, social events, technology and travel.
You can either plan on excluding Editorial Use Only images from your content strategy or have a thorough understanding of the usage rights. Be sure to read and understand the following articles:
Also note that whatever you download needs to be used! For instance, if you blog daily, you can plan on including two or three images per post, which will ensure you use each image at least once in the first twelve months. More from Shutterstock’s Terms of Service below:
Stockpile or otherwise store downloaded Images that are not used within twelve (12) months of the date on which you first downloaded such Image. If you fail to use an Image within twelve (12) months from the date of your first download of that Image, you lose all rights to use that Image.
Create Lightboxes
You are now signed in to Shutterstock, and have some content ideas. You’ll be organizing your images using Lightboxes (more on the origin of lightboxes at wikipedia).
Let’s create the first of five lightboxes with five images each. When we search on “yosemite,” we get 9,728 Stock Photos, Illustrations, and Vector Art. If only photography is desired, click “Refine Your Search,” click Photos instead of All Images, and click Search.
This results in a still overwhelming 9,663 images. To help refine the process, note that images can be sorted by New, Popular, Relevant and Random. You will also see Related Searches, which can be super-helpful. For instance, a search on “yosemite” provides the following related search terms: grand canyon, yellowstone, san francisco, mountain, yosemite national park, waterfall
When you find an image you like, mouse over it. You’ll get a larger view of the image, and an overlay with two images – one with a lightbulb, and the other a down arrow. The tooltip for the light bulb says “Save to a lightbox” – click this.
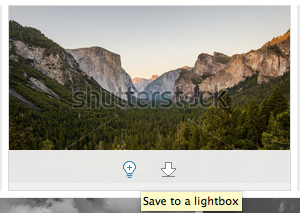
Where it says New Lightbox, enter the name of your lightbox, i.e. “yosemite” and click Save. This will bring up a pop-up window across the bottom of the browser that contains all the images in this Lightbox, along with navigation for sharing and other Lightboxes.
Now when you mouse over another image, and click the light bulb, you can add that image to an existing Lightbox. Add four more images to your first Lightbox, and it will look something like this at the bottom of your browser:

Continue this process until you have five Lightboxes with five images in each. You may need to click through each image to the individual image page to check to see if that image is for Editorial Use Only.
Create a Google spreadsheet
You’ll need a spreadsheet to stay organized. We recommend using a Google spreadsheet to keep your project organized, particularly if you have other team members that contribute or need to at least view the content strategy. An Excel spreadsheet will also work, but we’ll use Google for the example following.
Access the free Google spreadsheet we’ve created here:
ShutterStock Monthly Plan Template (link opens in new window)
If this is helpful, please Like this blog post, thanks!
For each day in the 30-day window you have to download images, you will list a number of Lightboxes and the quantity of images saved to each Lightbox. These quantities will then automatically get totaled up so that you download exactly 25 images per day.
Here’s what the spreadsheet looks like with five days worth of Lightboxes inputted:

Here’s how this spreadsheet works:
- The name of the lightbox (i.e. yosemite) has the number of saved images to the right (i.e. 5).
- These are then totaled up automatically in Column B.
- The images in the Lightboxes should total up exactly to 25, no more.
- Those 25 images are what you will download on that day.
Using Slugs
A proper naming convention is really important in order to stay organized.
We recommend assigning a “slug” to a Lightbox that will be used throughout the production process. So for instance, if a Lightbox is all about Cable Cars, then make the slug “cable-cars” – no upper-case, no spaces, no special characters.
From here on out, you will use the slug in every aspect of production. The names of the images (i.e. cable-cars-1.jpg, cable-cars-2.jpg, cable-cars-3.jpg), the pages in WordPress, the folders on your computer – everything will be consistent and searchable by always using the slug associated with the image.
Map out the full 30 days
Now that you have the ability to create Lightboxes in Shutterstock, and record the info in a Google spreadsheet, you can map out the entire 30 days of downloads.
You may want to leave a few days or slots open towards the end of the 30 day window. That way, as you are downloading images each day, you can fill in some gaps, or otherwise accommodate new ideas that will inevitably arise from this process.
Ultimately, you’ll have a nearly complete plan where every single day for 30 days you will know exactly what images you are downloading that day. The spreadsheet matches the lightboxes which matches your download plan.
Ready to sign up for the monthly service!
You now have your Lightboxes created on Shutterstock and Google Spreadsheet pretty much filled up. You know your 25 images marked for download for at least the first week. Let’s convert your account from free to paid.
Sign in to Shutterstock. From the home page, you can either click “Start Downloading” in the upper right or “See Plans and Pricing” down below the search bar.
Select the $249 Monthly Subscription and Buy Now. Once you’re all paid up, you can begin downloading.
RECOMMENDATION: Start the paid account when you have about two hours to do the first day of downloads. It’s best to start as early in the morning as possible, so you don’t have to wait a day if you miss the 24 hour daily cutoff. For instance, if you start at 11pm and download your 25 images, then you’d have to wait until 11pm the following evening for Day 2. So if you start at 8am on Day 1, then you can start downloading at 8am on Day 2.
Once the paid account has started, Shutterstock does a good job of telling you in multiple places how many downloads you have left for the day and the monthly period. Following is a screenshot from the left column of our account:

Cancel the recurring Auto Renewal monthly fee
If you’re going to download lots of images every month, keep the Auto Renewal active. If this is a one-shot deal, where you just need this month’s images, then you will want to cancel the recurring Auto Renewal monthly fee of $249.
Once you’re signed in and paid up:
- click “Hi, {username}” in the upper right
- click Account Details from the drop-down
- under “25-A-Day Subscription,” Auto Renewal: Turn OFF
- you can always re-enable this during the initial monthly period
Set up a recurring task
Use your existing task management system such as Asana or calendar system to create a Shutterstock task for Day 1. If your system allows you to, set this task to recur daily for 30 days. In that scenario, you would download your 25 images on Day 1, complete the task, and then it recurs on Day 2. You could also set up 30 tasks on a calendar. You just need a system that reminds you that you need to download your images daily.
Day 1: Download your images
You’ve signed up for the monthly plan, and now you are ready to download your first set of images. You should be logged in; in the upper-right of Shutterstock, you should see “Hi, {username}”. Click the drop-down and select Lightboxes. You should see all of your Lightboxes you’ve set up, with the oldest ones down at the bottom.
Over the course of the first few days, you’ll get your system down for downloading the day’s images as efficiently as possible. Here’s how we do it:
- From the Lightboxes page, right click on one of today’s target Lightboxes and open in new tab.
- You should see the five or so images you’ve added to that Lightbox. Right click and open each image in a new tab.
- You now have five or so tabs, each one showing the individual image detail page. Select the size image you want and click Download.
- That will take you to a download page where you input a four-digit number. Once you have done this, the image will download (to your Downloads folder, generally).
- The page will refresh to show a message that reads “Your image should begin downloading immediately” – you can now close this tab.
- Repeat for all images in the Lightbox. Then move on to the next Lightbox and download the next set of images. Cycle through all of the Lightboxes and images you’ve identified on your Google spreadsheet until you’ve completed the download of 25 images.
What size to pick? We select LARGE, because MEDIUM is sometimes a bit too small for a large, widescreen display and SUPER is just plain overkill for any web or digital usage. If you are also doing print, again make sure you understand Shutterstock’s usage rules, particularly around Editorial Use Only images.
Selecting LARGE will result in 25 images a day times 10MB or so on average – 250MB a day. Since we will also be archiving our images in a couple different formats, plan on having 15-20 gigabytes of disk space to work with for the month.
As appropriate, check your available storage in Dropbox or Box.com or Google Drive if in fact images are being saved to or backed up to these cloud storage platforms.
Determine your image sizes
Before we process the images any further, you’ll need to know for what size(s) you are formatting your images. Being extremely precise – to the pixel – is going to make the production process much easier and accurate.
One very important note on image size is that the images you download from Shutterstock are not uniform! The widths, the heights and the relationship between the two will all vary. For instance, one image might be 1024×768, and another might be 1024×780.
So what we will walk you through is creating a large, uniform size, and from there it is easy to resize to other formats.
You might be using the same image in a number of locations on a project. For one project, we identified three sizes – a blog header, a subject header and a thumbnail.
The blog header we knew was going to be full-width. We selected an image width of 960 pixels to conform to the 960 Grid system. However, each of our images vary in height, so that even if we resized every image to 960 pixels, we’d have that variance to deal with.
So we ended up choosing a somewhat arbitrary height of 400 pixels, to give those images a nice landscape feel on the page. There was our first image: 960 pixels wide by 400 pixels height (or 960×400).
Next was a main column width to serve as a subject header. The main column is 768 pixels at the max. We wanted the 768px images to be the exact same proportion as the blog header. Using any resize tool, be it in Photoshop or otherwise, gives us a height of 320 pixels. In other words, if you take a 960×400 image, and reduce the width to 768, then it automatically will resize the height to 320 pixels. So there’s our second image size: 768 pixels wide by 320 pixels height (or 768×320).
And finally, we needed a thumbnail image for a “related subjects” section. The width here was 370 pixels. Reducing that 960×400 image to 370 pixels width gives us a height of 154 pixels (or 370×154).
So the basic steps we will walk through are:
- Start with full-size, non-uniform images
- Resize to 960px width, with non-uniform height
- Crop all images to 960px by 400px
- Process those images to 768×320
- Process again to 370×154
- Be consistent in the naming convention every step of the way
Setting up your folders
You will need a number of folders to process your images. These should all be well organized, in a structure something like this:
- my-project
- source
- max-size
- archive
- staging
- 960-width
- archive
- 768-width
- archive
- 370-width
- archive
This is how it looks in Mac OS:
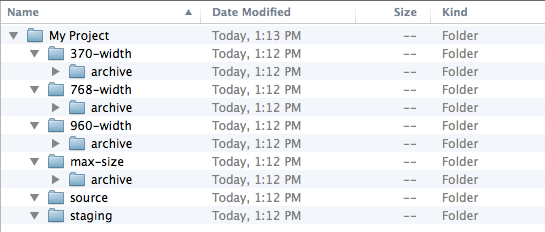
Save your original download images
You’ll now have a Downloads folder full of 25 images – it will look something like this:
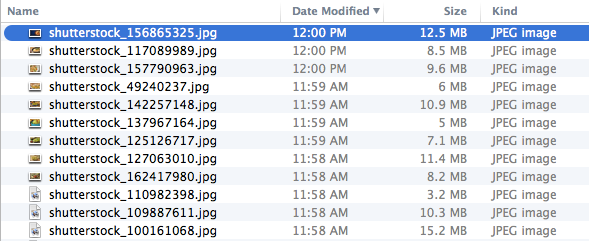
Copy and Paste (not Cut and Paste) these images to your new “Source” folder. Don’t rename or otherwise touch these images. Over the next 30 days, you’ll have 750 or so images in the “Source” folder, and each filename contains an image ID that will help you source the original image on Shutterstock if need be. (For instance, you might need to go back and check on attribution.)
Rename and move the images from the Downloads folder
Back in the Downloads folder, you have the original 25 images. Cut and Paste all those images into the “max-size” folder.
In the “max-size” folder, rename all of these to match the slugs you used in creating the lightbox, adding an integer to distinguish between each image. It will look something like this:
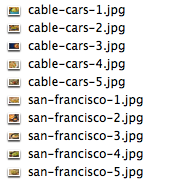
Now, Copy and Paste all of those renamed images into the “staging” folder. Move the images in “max-size” to “max-size > archive”.
The result at this point is:
- You have downloaded and archived your daily 25 images in two formats (original filename and new “slug”-based filename
- You have renamed your 25 images in the staging folder
- You are ready to start sizing your images
Process all images to a fixed width
Personally, we find batch processing in Photoshop to be a chore. There’s an awesome little app for the Mac called Image Bucket (iTunes/App Store link) which does a bang-up job of resizing and renaming images, and even adding a watermark.
Here are the basic steps, regardless of which resizing program you use. You can establish and document your own workflow to be as efficient as possible with your images and process.
- Import (drag-and-drop) your “staging” images into the resizing application
- Resize all images to your largest size (such as 960px as described above)
- It’s OK to overwrite the “staging” images once you’re comfortable with this process
- Keep the same “slug”-based filenames (i.e. cable-car-1.jpg)
- You now have 25 images that match your largest width (i.e. 960px) and have varying height (because that’s how Shutterstock rolls)
Cropping images to size
Now that you have a bunch of images that match your largest width (i.e. 960px), we need to crop the heights to size.
We do that in Photoshop, but you can use any graphics editing program that allows you to do this easily and efficiently. Here are our basic Photoshop steps:
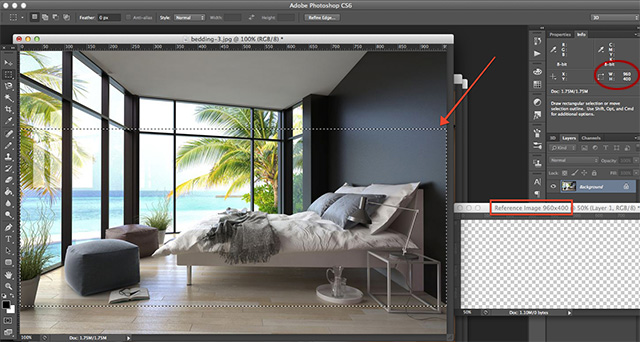
First, we create (or open) a reference image. This image should be precisely the size of your largest image format – for us, it’s 960 width by 400 height, 300dpi jpg. We reduce the size by zooming out a bit, then we Select All using the Rectangular Marquee Tool. This creates the rectangular marquee (moving bounding box) around the edges of the image. When the Rectangular Marquee Tool is selected, you can drag and drop this large image (960×400) on to another image, giving you the exact dimensions to which you are cropping.
Next, we drag and drop all 25 images into Photoshop. So we have 25 images opened, along with the large format reference image.
When you drag the rectangular marquee on to one of your 25 images, it should be exactly the same width, and less than the total height. Let’s look at the example below. In the lower right, we see the reference image, with the title “Reference Image 960×400.” The red arrow points to the rectangular marquee we have dragged on to the image we are resizing. And then in the upper right, in the red circle, are the dimensions of the marquee (960×400), which is the size we crop to.
Once the marquee is positioned correctly, crop it.
Then Save for Web (recommend jpg at 50% quality), saving over the existing image in the “staging” folder.
Repeat for all 25 images, so that every image in the “staging” folder is exactly to spec – in this example, 960×400.
QA! Step through the 25 images in the “staging” folder, and make sure they are all to spec. You’re going to be resizing these multiple times, so issues with improperly sized originals are compounded.
The files in the “staging” folder should still look like this:

Renaming and exporting for production
Back to our image resizing app (such as Image Bucket for Mac). Select (or drag-and-drop) all 25 images in the “staging” folder. First, we will export for the largest size, then the next two sizes.
Large Export (example: 960×400)
- Add a “postfix” of -960. This will change the filename from “cable-car-1.jpg” to “cable-car-1-960.jpg”
- Save to your large format folder (i.e. /MyProject/960-width/)
- Check to make sure that all 25 images are now in your large format folder, and have:
- correct filenames, i.e. cable-car-1-960.jpg
- correct dimensions, i.e. 960×400
- acceptable file size, approximately 50-100kb
Medium Export (example: 768×320)
To export to your medium size, select (or drag-and-drop) all 25 images in the “staging” folder.
- Add a “postfix” of -768. This will change the filename from “cable-car-1.jpg” to “cable-car-1-768.jpg”
- Resize the images to the medium size width (i.e. 768) with height proportional
- Save to your large format folder (i.e. /MyProject/768-width/)
- Check to make sure that all 25 images are now in your medium format folder, and have:
- correct filenames, i.e. cable-car-1-768.jpg
- correct dimensions, i.e. 768×320
- acceptable file size, approximately 30-50kb
Thumbnail Export (example: 370×154)
To export to your small/thumbnail size, select (or drag-and-drop) all 25 images in the “staging” folder.
- Add a “postfix” of -370. This will change the filename from “cable-car-1.jpg” to “cable-car-1-370.jpg”
- Resize the images to the thumbnail size width (i.e. 370) with height proportional
- Save to your thumbnail format folder (i.e. /MyProject/370-width/)
- Check to make sure that all 25 images are now in your small format folder, and have:
- correct filenames, i.e. cable-car-1-370.jpg
- correct dimensions, i.e. 370×154
- acceptable file size, approximately 10-20kb
FTP files to server or Backup to Dropbox
If these images need to be imported by a developer for your website, FTP files to a web server. Coordinate with the developer to ensure the naming convention is acceptable and to receive FTP access.
If these images will be manually selected for, i.e., blog posts, backup to a secure file repository like Dropbox. If you have any team members touching these files, make sure they also have an understanding of what the license allows you to do and not do.
Archiving Content
- Delete the images in the “staging” folder.
- Move the large format images to the archive sub-folder.
- Move the medium format images to the archive sub-folder.
- Move the thumbnail format images to the archive sub-folder.
- Note completion on your Google Spreadsheet, perhaps by changing the background color in column A.
Repeat on Day 2!
Within in a few days, you’ll feel increasingly comfortable with the process. We can execute this daily in about half an hour, if pre-production elements (Lightboxes and spreadsheet) are set up properly.
Hopefully we’ve made this fairly complicated project less daunting and easier to execute well. The benefits of it are tremendous for businesses that need high-quality, licensed images for their projects. Comments? Likes?
We are signed up for the standard Shutterstock affiliate program. You can support quality posts like this by using our link to sign up for the Shutterstock subscription plan.
How To Cancel Your Shutterstock Subscription Plan
So you’re done, you’ve had enough. How you cancel depends on the plan. If you have a Monthly plan, turn off the Auto Renewal feature in your account. If you have an On Demand plan, you’ll retain access to any remaining downloads until they expire (365 days after purchase). Annual Subscriptions are a little more complicated because of the pro-rated monthly discount. Shutterstock says you might incur a fee to cancel an Annual plan. In this case, they suggest a phone call – 1-866-663-3954 in the US.
UPDATED: AUGUST 22, 2020

Comments
This is a well thought out plan of attack, but it’s basically necessitated by the fact that the Shutterstock bean counters want to make it as difficult as possible to download the images you’ve already paid for. Note the comments in the following article on their blog – bulk downloading from lightboxes would make things sooo much easier (select preferred image size, then download them all): http://www.shutterstock.com/blog/2010/02/seven-tips-for-lightbox-power-users/
Hi George – Thanks for the comments. Totally agreed – there’s a priority on transaction over consumption. That’s pretty common in bricks-and-mortar (gym memberships, all-you-can-eat buffets) as much as it is online. It’s up to the customer to get the most out of their purchase, and it’s nice when the vendor has a toolset that facilitates (and not hinders) this.